For a project I had to figure out how to make an http GET call and handle the JSON data. This would have been a little easier if my experience was in Java application development but most of my experience have been in C#/.NET. This post goes step by step from creating a new Android Project to getting the data back and deserializing it and then displaying it. However, displaying or fancy UI is not really the focus of this post.
Technologies and tools used:
- Android Studio 4.1.2
- Volley – an Http library for Android Apps available on GitHub
- A Note from the guide… “Volley is not suitable for large download or streaming operations, since Volley holds all responses in memory during parsing. For large download operations, consider using an alternative like DownloadManager.”
- Gson – library to convert Java Objects JSON
- Bing Maps Local Search API returns a list of business entities centered around a location or a geographic region
- Postman to test the API calls
Here we go…
Bing Maps
- Have access to the API key unless you don’t need one. In this case have request Bing Maps API key from https://www.microsoft.com/en-us/maps/create-a-bing-maps-key
Postman
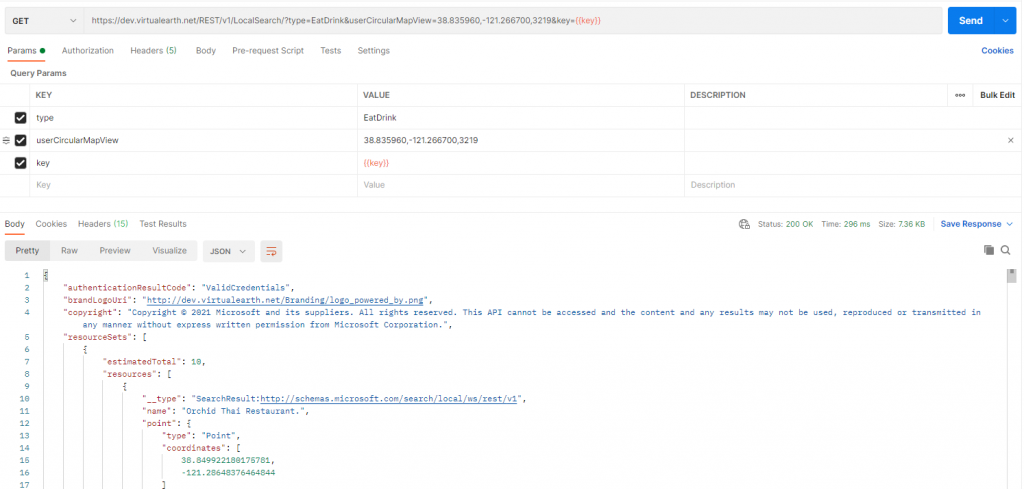
- Let’s first make sure we have a working API call in postman. Download postman or use their web version and create a new request similar to this:
- GET https://dev.virtualearth.net/REST/v1/LocalSearch/?type=EatDrink&userCircularMapView=38.835960,-121.266700,3219&key={{key}}
- Note: the above url uses a variable ‘key’ that I have created in postman to hold the Bing Maps API key
- If you are not creating a variable then provide the key value directly in the URL without {{}}
- Send the request.

Android
- Create a new Android project using Empty Activity template
- Add a reference to volley and gson libraries to the list of dependencies inside your Module build.gradle script
dependencies {

    ...
    implementation 'com.android.volley:volley:1.2.0'
    implementation 'com.google.code.gson:gson:2.8.6'
}
- You will get a notification to sync the project, go ahead and click Sync Now
- Create classes for the response we received in the postman. These class will be used to convert the JSON response into Java Object. There are a few online sites available that makes this task a lot easier. I used http://www.jsonschema2pojo.org/ for the following reasons:
- You can specify the package name so that the new classes get the same package name as in the Android package
- You can specify the class name of the root class that becomes the root of the response
- You can specify the annotation style. Since we have are using gson library already, I have opted to go with the Gson annotation.

- Click the Zip button and a link will be generated to download the file. Download and extract the content of the zip file. Select all file and copy (Ctrl+C)

- Paste them in in the same folder as the MainActivity.java class

- Create a new class GsonRequest in the same folder and copy code from https://developer.android.com/training/volley/request-custom#example:-gsonrequest

- Hover over the red texts in the code and you should get an option to import missing packages. In some cases you will get multiple options, make sure to select the correct package. This is how it looked once all references were resolved

- Add the following lines in AndroidManifest.xml file to get permissions to perform network operations
    <uses-permission android:name="android.permission.INTERNET" />
<uses-permission android:name="android.permission.ACCESS_NETWORK_STATE" />- Store Bing Maps API Key as a string resource in strings.xml file under res/values folder

- In the MainActivity.java class create a new method, I’m calling it bingMapsLocalSearch(). The code below explains the details of the code
private void bingMapsLocalSearch(String type, Double latitude, Double longitude) {

    // API Key is stored as a string resource in strings.xml. We have to use getString method as R.string.bingMapsApiKey returns a number
    String apiKey = getString(R.string.bingMapsApiKey);

    // Default values for testing
    if (type == null) type = "EatDrink";
    // TO-Do: need to get coordinates from phone location
    if (latitude == null) latitude = 38.835960;
    if (longitude == null) longitude = -121.266701;

    // user location
    String userLocation = String.format("%f,%f", latitude, longitude);
    // Max results. Currently Bing Maps API support up to a max of 25 records
    String maxRes = "25";

    // API url for bing maps local search
    String url = String.format("https://dev.virtualearth.net/REST/v1/LocalSearch/?type=%s&userLocation=%s&maxRes=%s&key=%s", type, userLocation, maxRes, apiKey);

    // Instantiate the RequestQueue. Our request will be sent to this queue
    RequestQueue queue = Volley.newRequestQueue(this);

    // Create the request
    GsonRequest<LocalSearchResponse> gsonRequest = new GsonRequest(url, LocalSearchResponse.class, null,
            new Response.Listener<LocalSearchResponse>() {
                @Override
                public void onResponse(LocalSearchResponse response) {
                    // At this point we are just logging a success message to the console
                    System.out.println("Success");
                }
            }, new Response.ErrorListener() {
                @Override
                public void onErrorResponse(VolleyError error) {
                    // At this point we are just logging a failure message to the console
                    System.out.println("Fail");
                }
            });

    // Add the request to the RequestQueue.
    queue.add(gsonRequest);
}- Now add a call to this method from onCreate of the MainActivity class
- bingMapsLocalSearch(null, null, null);
- Set breakpoints at both the println lines and debug. If all pieces of the puzzle are in place you should get a http 200 OK response.

- Next we will create UI to make use of the data returned in the response. Since this post is not about the UI, I’ll keep it simple and just have a list view control to shows a list of business returned from this hard-coded api call (recall the coordinates are fixed values). Later on we will create controls to get that data either from phones location or have it entered on the UI.
UI
- Create a view that looks something like this

- Here is code for that
<?xml version="1.0" encoding="utf-8"?>
<androidx.constraintlayout.widget.ConstraintLayout xmlns:android="http://schemas.android.com/apk/res/android"
    xmlns:app="http://schemas.android.com/apk/res-auto"
    xmlns:tools="http://schemas.android.com/tools"
    android:layout_width="match_parent"
    android:layout_height="match_parent"
    tools:context=".MainActivity">

    <TableLayout
        android:layout_width="match_parent"
        android:layout_height="match_parent">

        <TableRow
            android:layout_width="match_parent"
            android:layout_height="match_parent">

            <TextView
                android:id="@+id/appLabelTextView"
                android:layout_width="371dp"
                android:layout_height="wrap_content"
                android:ems="10"
                android:inputType="none"
                android:text="@string/app_label"
                android:textSize="18sp" />
        </TableRow>

        <TableRow
            android:layout_width="match_parent"
            android:layout_height="match_parent" >

            <com.google.android.material.textfield.TextInputLayout
                android:layout_width="match_parent"
                android:layout_height="wrap_content">

                <com.google.android.material.textfield.TextInputEditText
                    android:id="@+id/cityStateEditText"
                    android:layout_width="match_parent"
                    android:layout_height="wrap_content"
                    android:hint="Enter City, State" />
            </com.google.android.material.textfield.TextInputLayout>
        </TableRow>

        <TableRow
            android:layout_width="match_parent"
            android:layout_height="match_parent" >

            <Button
                android:id="@+id/searchButton"
                android:layout_width="249dp"
                android:layout_height="wrap_content"
                android:onClick="searchButtonOnClick"
                android:text="@string/search_button_label" />
        </TableRow>

        <TableRow
            android:layout_width="match_parent"
            android:layout_height="match_parent">

            <ListView
                android:id="@+id/searchResultsListView"
                android:layout_width="match_parent"
                android:layout_height="wrap_content" />

        </TableRow>

        <TableRow
            android:layout_width="match_parent"
            android:layout_height="wrap_content" >

            <View
                android:id="@+id/line1"
                android:layout_width="match_parent"
                android:layout_height="3dip"
                android:layout_weight="1"
                android:background="#5A5353"
                android:padding="2dip" />
        </TableRow>

        <TableRow
            android:layout_width="match_parent"
            android:layout_height="match_parent" >

            <TextView
                android:id="@+id/MSCopyrightTextView"
                android:layout_width="wrap_content"
                android:layout_height="wrap_content"
                android:ems="10"
                android:inputType="none"
                android:singleLine="false"
                android:textSize="14sp" />
        </TableRow>

    </TableLayout>
</androidx.constraintlayout.widget.ConstraintLayout>- Wire-up the controls in the main activity class. Note: call to the bingMapsLocalSearch is now triggered by the button click event.

- Create a method to load the list view control with the data received from the API. Here is the code for that. (Examine the response in postman or see Bing Maps API documentation for more details about the response)
private void LoadListViewData(LocalSearchResponse response) {
    List<ResourceSet> resourceSetList = response.getResourceSets();
    List<Resource> resources = null;
    ArrayList<String> businessNames = new ArrayList<String>();
    if (resourceSetList != null) {
        for (ResourceSet resourceSet : resourceSetList) {
            resources = resourceSet.getResources();
            break;
        }
    }
    if (resources != null){
        for (Resource resource : resources) {
            businessNames.add(String.format("%s %s", resource.getName(), resource.getPhoneNumber()));
        }
    }
    if (businessNames.size() > 0) {
        businessNames.add(0, String.format("%s resources found", businessNames.size()));
    }
    else {
        businessNames.add(0, "No resources found");
    }

    ArrayAdapter<String> itemsAdapter =
            new ArrayAdapter<String>(this, android.R.layout.simple_list_item_1, businessNames);
    searchResultsListView.setAdapter(itemsAdapter);
}- Call LoadListViewData method from bingMapsLocalSearch method when we have a successful response from the API call in the. So, find the line System.out.println(“Success”); and enter the following code below it
if (response.getStatusCode() == 200){
    // Display copyright information from Microsoft
    MSCopyrightTextView.setText(response.getCopyright());
    LoadListViewData(response);
}- Run program and click the Search button. If the api call was successful you should get some results and it should look something like this

That’s all for making a call to REST API and displaying the data. Obviously a lot of improvements could be done while still keeping the app very basic. I’ll leave it up to you to make it better 🙂

